Showing posts with label tutorial. Show all posts

DIY Shoe Makeover


It's as easy as that! I had found these flats at Ross for $12 and covered the generic leopard print with black Sharpie. The tassels came from the craft store for $2.99 (for four). If you can't find tassels with loops long enough to tie into a bow shape, consider using cool vintage buttons to cover the knot!

♥

Braidin' & Beadin' Bracelet DIY


What You'll Need:


• embroidery thread, or thin thin string or cord
• 50-80 beads (make sure all the string will fit!)
• 1-3 needlepoint needles (optional)**
**I like to thread a thin embroidery or needlepoint needle onto each of the three strands I'm braiding and beading. It's not necessary but trust me, it makes the beading part a whole lot easier and faster.

Step 1

For a single loop bracelet, cut three 36" (about 90cm) length of embroidery thread. If you'd like to make a double or triple length wrap bracelet, add about six extra inches for each desired loop. Fold the bundle of threads in half and tie a knot, leaving a medium sized loop. This will become the "eye" of the closure. You can either use tape to secure your work to a hard surface, or a safety pin to anchor it to the knee of your jeans. Tape or pin the loop to your work surface and divide the threads into three groups. Have your beads handy nearby in a shallow dish or something.

**This is when I would thread a needlepoint needle onto each braiding strand and string a few beads onto the lower part of each. Note: After trying this bracelet method with single strands and the smaller beads, I really wasn't satisfied, so I made another with doubled strands; hence this tutorial ;) You can see both results at the end.
 

Step 2

Start braiding! I braided straight thread for a half inch before I started incorporating beads. This part is up to you; you could start sliding beads up right off the bat. To braid in the beads, start with the left thread (1). Push a bead up close to your bracelet and fold string 1 over string 2. Repeat this process with the right string (3); and so on as you continue a basic braid. Experiment with braiding a section or two between bead clusters; I found that small beads can be braided in close to each other, but larger one need more room to lay out properly. I got fancy with the alternating beads, but they look really pretty when they're all smooth edged, too.


Step 3


End the bracelet as you started: leave out the beads and tie a knot with the thread when you reach your desired length. I found it very easy to just use more beads to make a closure, but of course you could use a button or other larger bead, or actual real jewelry supplies ;) For mine, I threaded a few beads onto each thread before tying them all into another knot, creating a little ball of beads to anchor through the loop.


Ta-Da!


♥ consider checking out Honestly WTF's beaded bracelet tutorial for more ideas and "simpler" instructions. :) 
Enjoy ♥

diy recycled t-skirt


Step 1. Find a t-shirt large enough to go around your hips with some extra space, unless you'd like to make a body con skirt, in which case I recommend leaving out the pockets. I used a faded XL mens tee from the thrift store. A bit wrinkly, but I'm no perfectionist. Lay it out flat and get some scissors.
Step 2. Cut across from armpit to armpit, leaving a tube of fabric on bottom. Keep the other stuff aside.


Step 3. I used another skirt to trace and cut out an a-line shape for my skirt. If you leave the skirt as wide at the top as at the bottom, you'll get a fuller skirt; just remember it will require more gathering later when we do the waistband...

Step 4. Using the remainder of the t-shirt, cut out the wide fabric pieces that will become the waistband. The width will reflect half of your waist circumference. The height will be halved during sewing. I didn't really measure mine too carefully, since jersey knits can be nicely forgiving.


Step 5. Make a straight cut  across each sleeve, from the armpit to the shoulder. These will become your side pockets.  Now you're all ready to start pinning and sewing! You can throw away the last bit of neckband material left over.


Step 6. Let's start with the pockets. With good sides together, pin and sew the sleeve/pockets to the sides of the skirt starting an inch or two below the top of the skirt. Do this with both pieces of fabric. *Note: if you chose not to cut the skirt after Step 3 and you do want pockets, cut the sides of the t-shirt open so you can insert the pockets. Otherwise you can leave the tube intact and pocket-less. Or, consider using the sleeve fabric to cut out some patch pockets.
Step 7. Now open out the pocket flaps and align the two pieces good sides together, pocket to pocket and skirt to skirt. Sew from the waistband down along the entire side of the skirt; when you turn it inside out, the flaps will stay inside and form pockets!

{{Disclaimer: it's late and I'm really tired and mucked up the numbering in the photos, so please excuse the addition of a second step seven}}


Step Seven. Now for the waistband: sew the edges of the two pieces together to form a tube, then fold it open lengthwise so the seams don't show and you have a double sided band to affix to the skirt.
Step 8. Mark the front, back and side points on both your waistband and the skirt. With the skirt turned right side out and the waistband raw edges up, pin the waistband to the skirt at those points.


Step 9. Sew the waistband to the skirt, leaving a small section on one side open so you can insert a drawstring or elastic later. You're probably going to need to stretch the waistband to fit the skirt as you sew. If you didn't make an a-line skirt, you'll either need to do a lot more stretching or a lot more gathering at the waist.
Step 10. Try it on! Make any necessary adjustments to the snugness of the waist with elastic.


This is the random photo I pinned after falling in love with the cut and buttons. I sewed pewter-black buttons down the front of my skirt. Check {here} to see how I styled it for the first time!


 Let me know what you think!
♥ Meghan
DIY Faux Fur Clutch

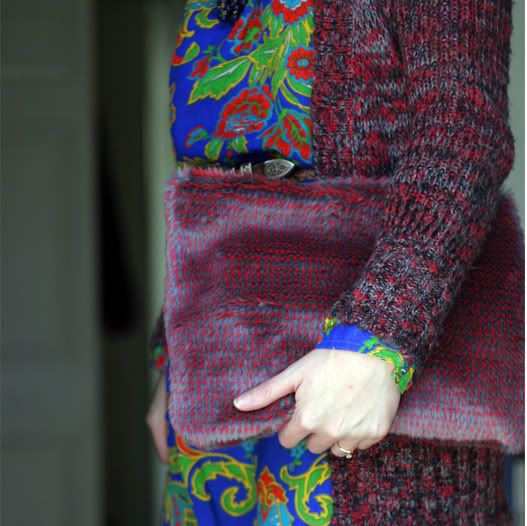
I've been seeing luxurious furs adorning the necks of street style stars for years, but lately even their clutches are gloriously fuzzy! Here's a tutorial to make your own simple zippered faux fur clutch, which I've discovered can also double as a pillow or lap warmer. Change the measurements and your iPad could have a jazzy fur coat, too!

My version:
Materials:
1/3 yard faux fur*
12" zipper

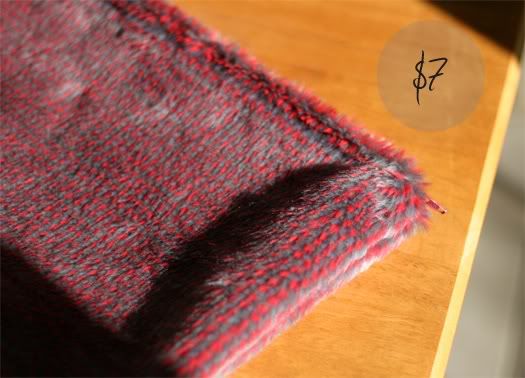
*Materials: You only need about 1/4 to 3/8 yard fabric for the clutch. The length cut will form the height of the clutch. Faux fur comes in many price ranges; super-soft, realistic stuff (it's called Minky) can get up to $40 a yard, while more unnatural looking (and feeling) faux furs are often sold on remnant tables for less than $10 a yard. It's also possible to find faux fur vests or other clothing items you can cut up at the thrift store or flea market. Most fabric and craft stores sell zippers in dozens of sizes and colors for less than $4. An even more eco-friendly and affordable option would be to remove the zipper from an old piece of clothing.

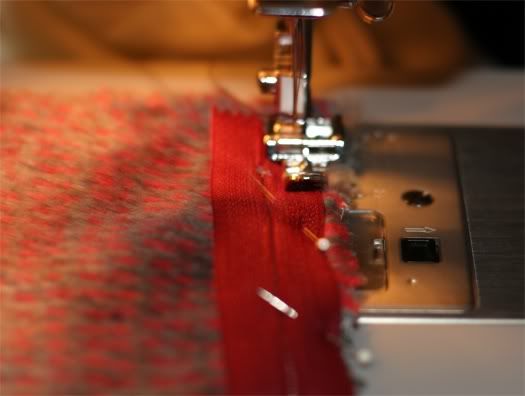
Also, you'll need to find the zipper foot attachment for your sewing machine. The regular presser foot won't allow you to sew closely enough alongside the zipper.
What I Did: I bought a burgundy 12" zipper and bought 1/3 yard of grey and red faux fur from the remnant tables at Beverly's Fabrics.

Step 1: Cutting
Cut two rectangles out of your fur. The width should be about the length of the zipper, plus a few inches for seams. The height will determine how tall the bag is. To keep it proportional looking, make sure the clutch is wider than it is tall, but not too skinny and long.
What I Did:  Since I used a 12" zipper, I cut two pieces of fabric that were 14" wide and 10" tall.

Step 2: The Zipper
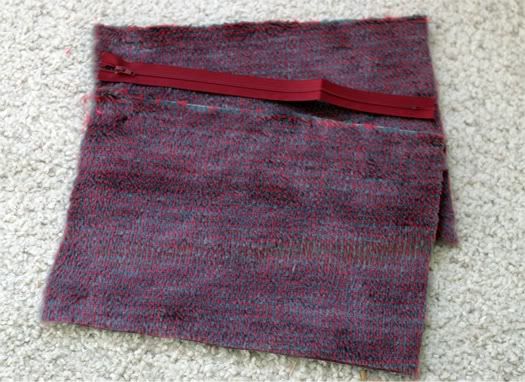
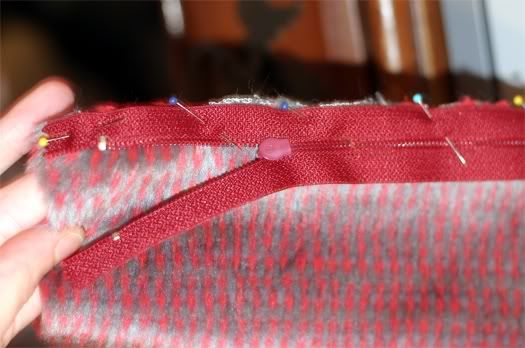
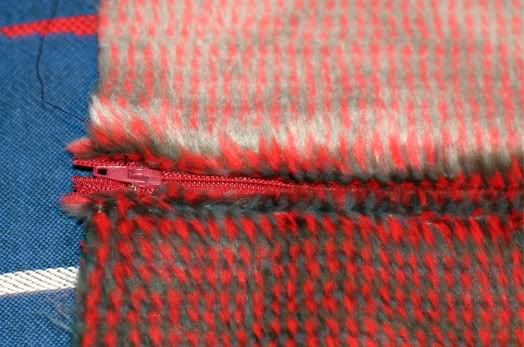
Pin the zipper front side down to the top edge of one furry piece. To get past the zipper pull at the top, unzip the zipper a few inches before starting your stitch. Once you've sewn a few inches, zip the zipper back up before you continue sewing. Repeat with the other piece of fabric, making sure to line up the edges of the fabric as evenly as you can. Now you should have two rectangles of fabric joined by a zipper, and you're almost done!


Step 3: Finishing
Pin the right sides of the fabric together, edges aligned and the zipper straight and even. Before you actually sew your bag shut, it's VERY important to open the zipper up at least a few inches, so you can turn the bag inside out later. Make sure to sew carefully through the zipper ends as well. Turn your bag inside out, make sure the zipper works, and if you want, use a pin to pull out the fur caught in the seams...

Voila!


Happy Sewing!

Easy Bow Belt DIY

What better way to welcome in the holiday season with some do-it-yourself goodies! I was really inspired by  (and wanted!) {this red bow belt} and knew it could make a great simple project. A skinny belt is a flattering way to add a little sumpthin' sumpthin' to a basic sweater or plain dress. You could also wrap it around your wrist a bunch of times to make a festive cuff, wear it as a headband, or use the technique for unique, personalized gift wrappers!


Prep: 
The amount of ribbon depends mostly on your waistline and desired bow size. I used 1 1/4 yards of red velvet ribbon, but there are other types and other materials to consider. You really just need enough flat material; heavy lace trim or thin leather could work, too. Let's get creative! I want to make a studded black leather one next, and a lace pink one with a rosette. Glue can make putting the bow together much quicker, but it can also be sewn with a few stitches. The needle and thread are necessary to securely attach the snap closure (glue won't grip the metal and ribbon well enough). If you can't find a snap, consider using a pretty little brooch, button or safety pin to secure the ends of the belt around your waist.

Cut a length of ribbon that will fit comfortably around where you want to wear your belt; lay that piece aside until step 2. We're gonna make the bow first, with the leftover ribbon. My belt bow is made up of two flattened loops of different length, stacked atop each other and cinched in the center by a third small piece. Velvet ribbon is  pretty thick, but if you used flatter satin or grosgrain ribbon you could easily make three or more loops and a more elaborate bow. My pieces were about 9" and 6" long. If you're in planning mode, each piece will need to be twice as long as your desired loop. You'll also need one small piece that will form the center of the bow, about 2" long. I put a gold stud on the center of mine before incorporating it, and a button would be really cute too!


{Step 1} Fold each piece in half and mark the center point with a pin or a chalk mark on the back side. Fold the edges inward to meet at the middle point (that black dotted line in the photo) and glue or sew down, forming a sort of loop that's flat in the center. Squeeze the fabric for several seconds, then place under something weighty, like a book, and leave them to dry for about fifteen minutes (depending on the glue you're using).

{Step 2} If you're going to attach a snap or other fancy closure hardware, this would be a good time to do so. Remember to place each piece on the correct side! I messed this up the first time and had to redo one side so the ends matched up. I'll probably just use one of those tiny gold safety pins on the next ones though (me=lazy).

{Step 3} Let's put the pieces together! Stack the flattened loops atop each other with the glued edges facing the bottom and the smaller loop on top. Glue (or sew) together in the middle. Then glue the center of the littlest piece across the opposite way. Squeeze the center stack tightly for about fifteen seconds to let the glue set a bit, then glue the edges around to the back to the bow and squeeze tightly (velvet is so fluffy I didn't want the bow to stick out too much!) I stuck the bow under my laptop and let it dry fully overnight; if you sewed it, well you are just about done!

Glue or sew the bow to the belt, snap or tie it on and...


P.S. If you make one and post about it somewhere, I'd love it if you left a link! ♥

Quickie DIY Denim Vest


I've been hanging on to this embroidered jean jacket that I found for $2 in the thrift store kids' section, waiting to turn it into something a little tougher. I finally had the time to take the scissors to it...


...cutting along the outside of the seam...


...and voila! A cute new layering piece for sweaters and dresses as we go into Fall.


I'll wear it later this week, once I finish my studding spree (more on that later, too).


10 Minute Bracelet

In case you haven't noticed, I'm pretty obsessed with arm parties right now. I bet a lot of you are pretty adept at all the bracelet tutorials out there, but in case you're not, or you need a refresher, I did a quick little DIY bracelet how-to based on those of the fabulous Honestly WTF. I hope you enjoy!


What you'll need:
♥ embroidery floss* 
♥ 1 1/2 feet cording**
♥ ball chain***
♥ 10 minutes

* Embroidery floss/thread is usually less than fifty cents a skein, and you don't need the whole thing, either. Thin string or yarns would work, too. Hell, dental floss comes in a few colors and would make your wrist would smell nice; plus, you'd score some punk rock points!
** I used some cheap pleather braided lacing, but feel free to experiment with suede strips, hemp cord, or colored laces. This will be the foundation of the bracelet, so make sure it's not thinner than your ball chain. It will need to be long enough to go around your wrist twice, plus several extra inches for the knot and loop hole.
*** I literally found that brass ball chain on the ground and removed the clasp, so I'm not entirely sure where you can buy them. Perhaps the hardware store? Sorry, I realize that is not very helpful... You could also use rhinestone trim or chunky chain from the craft store.
Not sure which colors to use? Check out my color wheel post for inspiration!


Fold the cording in half, making a loop closure. Tie a tight double knot with the embroidery thread around the base of the loop to secure, than start wrapping the thread over the knot and down the cord. I like to wrap the thread for about 1/4" before I add the ball chain, then secure that first section a few times before moving on...


as the bracelet progresses, I like to help shape it into a circle by holding the cording and ball chain together with one hand, while using the other to wrap the thread. Make sure not to let the cord or chain twist around each other as you go.


When you reach the desired length, wrap the thread several times around the last ball chain segment and cording, then tie off. Make a knot with the ends of the cording, trim the excess, slide the knot through the loop, and voila!


Know of any more cool bracelet ideas? Let's share!!

DIY Convertible Sash

A while ago a reader asked for a tutorial on how to make those versatile stretchy strips of fabric sold at American Apparel as The Sash. It's a pretty rad accessory that can be worn multiple ways: as a belt, sash, scarf, necktie, turban, etc. It is also probably the single easiest thing to make, but I've just been putting off writing the post. Messing about with blogger takes much longer than actually making the belt! I also ended up using extra dye to turn my sash turquoise for the after photos, so don't get thrown off. All you really need is a piece of jersey (also known as t-shirt knit)!
 
What you'll need:
- 5" or 1/6th yard jersey knit**
- 5-10 minutes
- scissors


**The stretchier the knit, the better the sash will fit and hang, so be sure to give the jerseys a few tugs. I used a fabric similar to men's t-shirt weight—not the most flexible. Swimsuit lycra and stretch lace are other fun options. American Apparel's sash is 85" wide, which allows you to wrap it around the waist or head multiple times, instead of just once or twice. In stores, jersey generally comes 60" wide, so a simple 60" by 5" piece shown above should be very easy and inexpensive to acquire. I had a fair amount of leftover beige jersey, so I just cut a 5" strip off of that. If you'd like, you can cut out two 50" by 5" pieces and join them together at a short edge to create a longer sash. Also, ya don't have to make it 5" wide; that's just a general guideline that matches the store version.


Jersey fabrics don't really unravel, so you don't have to worry about finished any edges. If you'd like, you can trim the short ends at an angle to add flair, or use pinking shears for a sweeter look. Heck, you could pink the entire rim of the sash! Or make a wider sash and cutting in fringe... oh my, I'm getting more ideas! Are you?!


Okay, now it's up to us to animate this lifeless scrap! I tried to show the basic variations, but I'm sure you can come up with more, especially if you make a longer one. Bandage dress, anyone? ;)


Happy Crafting!
<3 Meghan


P.S. I always try to answer any questions in the comments so everyone can benefit, and I love love love it if you send or post pics of your creations and how you live in them!

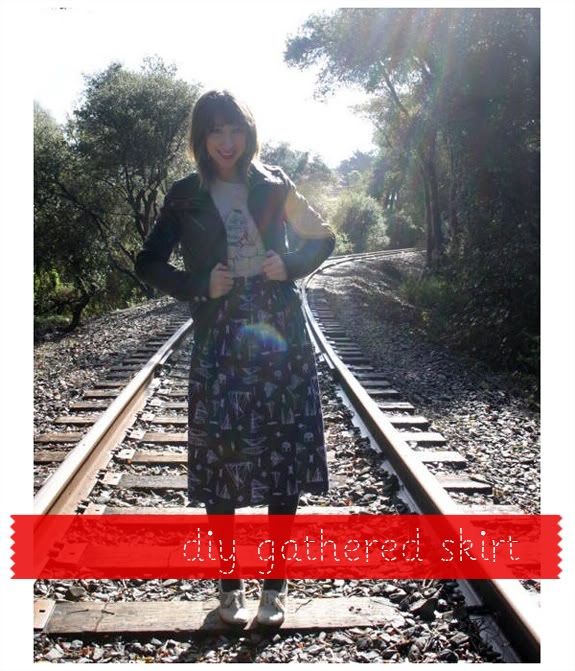
Gathered Skirt Tutorial

diy skirt gathered gathering sewing

What You'll Need:
• scissors
• safety pin
• sewing machine or needle + thread
• 1 1/4" wide elastic*
• 3/4 to 1 1/2 yards fabric, pre-washed**

*You'll want to get enough elastic to stretch comfortably around your waist. The easiest way to determine the amount is to measure your waist, subtract a few inches from that number, and voila. You may use a slimmer elastic if you prefer a slimmer waistband.

** The amount, or length, of fabric you buy will determine the length of the skirt. I bought 36" inches (or one yard) in order to make a long skirt for my short self. If you want to make a longer or shorter skirt, measure from your waist to the desired length, add four inches for hemming safety, and get that amount. I made sure to choose a wide fabric so my skirt would be very gathered and full; this piece was 60 inches wide. Beware of fabrics with a width of 45 inches—unless you're child-size, that's not going to make a very fun skirt using this tutorial ;]

Where To Shop?
As to where to get your fabric, I am a big fan of the remnant tables in most fabric stores. This is where factory ends go, which means sometimes you can find a fabulous print or texture for much less. I used a medium-weight jersey for this skirt, but you could use almost anything: knit, cotton, linen, flannel, etc. You could also use vintage tablecloths, or sew a bunch of thrifted scarves together, or recycle an old muumuu...


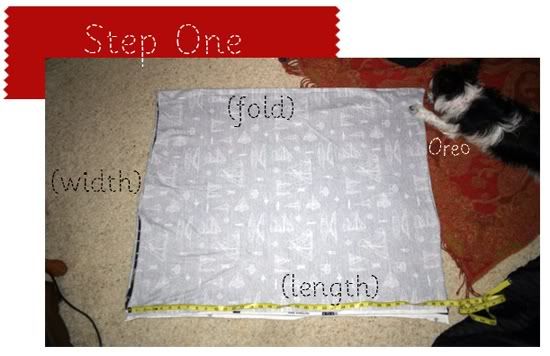
Step One: Lay It Out!
As you can see from the photo, Oreo wanted to help while I lay out my fabric. This is to make sure the edges are straight; trim off any crooked spots.

Making sure the pretty sides of the fabric are facing each other (like in the photo), sew a straight seam down the length of the fabric, creating a wide tube. This seam will be the center back seam of your skirt.

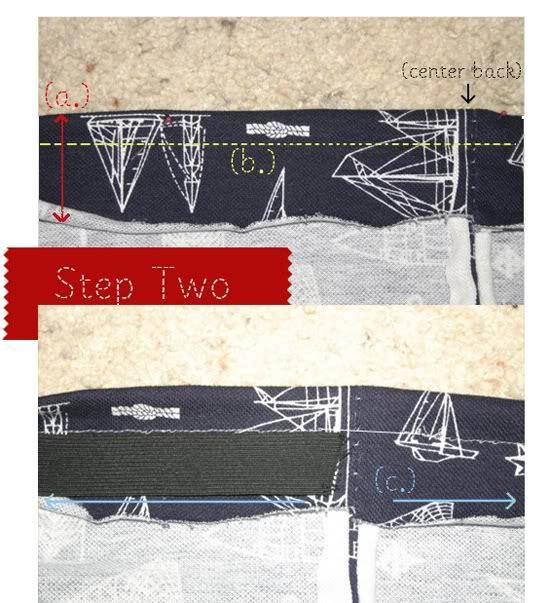
Step Two: Making the Waistband/Elastic Casing
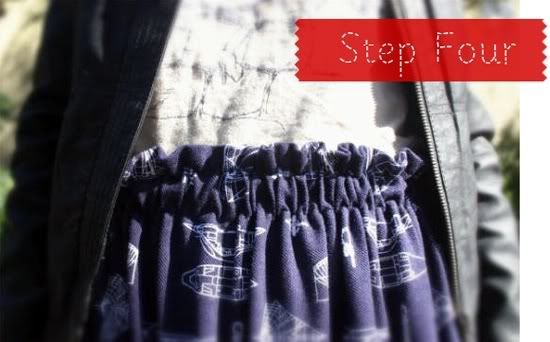
(a.) Next, determine which edge will form the top of the skirt. Fold over the edge by two inches and iron or pin. This will become the casing for your elastic. If you are using a skinnier elastic, you don't need to fold down quite as much.
(b.) Sew a straight stitch along the indicated line, using your presser foot as a guide. 
(c.) Line your elastic up to determine the necessary width of the casing. Sew, making sure to leave a few inches open at the center back so you can thread the elastic through.
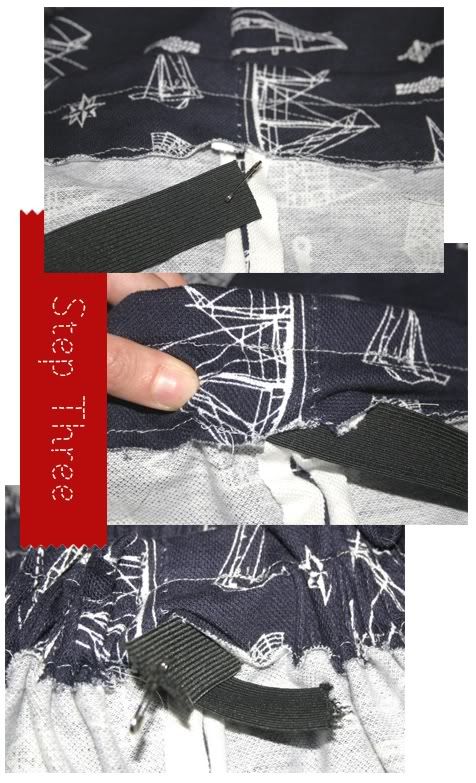
Step Three: Inserting the Elastic
Attach a safety pin to one end of your elastic. This will provide you with something to hold on to as you snake the elastic through the casing. After you have the elastic pulled all the way through, sew the ends together. You'll probably want to run the machine back a forth a few times to make a strong seam. Once the ends are joined you can let the loop of elastic disappear into the casing. Sewing shut that small space is an optional step I'm often too lazy for ;]

Step Four: Finishing Touches
Now you can try on your skirt! Check the fit of the waistband; if it is too loose, pull the ends back out and adjust. Check the length;  if you'd like to shorten your skirt, cut off the desired amount, and/or just fold over and hem the skirt as is.
Well there you gals go, I hope you enjoy making some new skirts for Spring! Let 
me know if you have questions and I'll try to answer them shortly in the comments.
If you'd like to check out some of my other sewing projects, go here :)

DIY Pom Headband

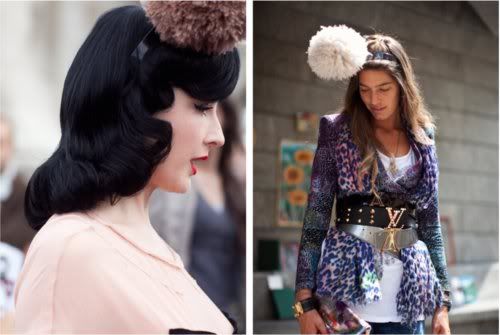
Here are some simple instructions on how to recreate Sonia Rykiel's oversize pom-pom headband.


Materials
  • small ball of yarn (I used Vanna White's "Linen" yarn for Lion, ha)
  • small pieces of cardboard two to six inches across
  • scissors
  • basic headband
  • a few episodes of your favorite tv show


Step One: Cardboard Prep
Cut cardboard into two equal circles. I first cut out two squares, then trimmed off the corners to make rough circles. The size of the circles corresponds with the size of the resulting pom. Poke the tip of the scissor through the center of each cardboard circle. Rotate scissors to enlarge the hole, creating a kind of two-layer doughnut.


Step Two: Yarn
Pull off several yards of yarn. To avoid tangling, make this into a smaller skein. Starting wrapping the yarn around the cardboard doughnut. When you run out of yarn, tie on a new length near the center of the circle, so the knot won't show.
Wrap evenly in multiple layers, until the cardboard doesn't show through. The more yarn you add at this point will give you a thicker, sturdier pom pom. When satisfied, tie ends of yarn together several times near the center of the circle.


Step Three: Cut
Start cutting the loops on the outer edge of the circle where the yarn crosses the meeting of the two cardboard pieces. Continue cutting around the edge of the circle.


Step Four: Finish
Pull the two cardboard circles away from each other by about a half inch. Wrap a foot-long length of yarn tightly around the enter of the bundle, knot off, then pull off the cardboard. Fluff into place. Tie onto a headband, or to a brooch back, trim any wayward strands if you wish, and wear with aplomb!


Basic Cost: $4